White Velvet Layer Cake
by Anna Olson
Excerpted from Anna Olson’s Baking Wisdom: The Complete Guide: Everything You Need to Know to Make You a Better Baker (with 150+ Recipes) by Anna Olson. Copyright © 2023 Olson Food Concepts Inc. Photography by Janis Nicolay. Published by Appetite by Random House®, a division of Penguin Random House Canada Limited. Reproduced by arrangement with the Publisher. All rights reserved.
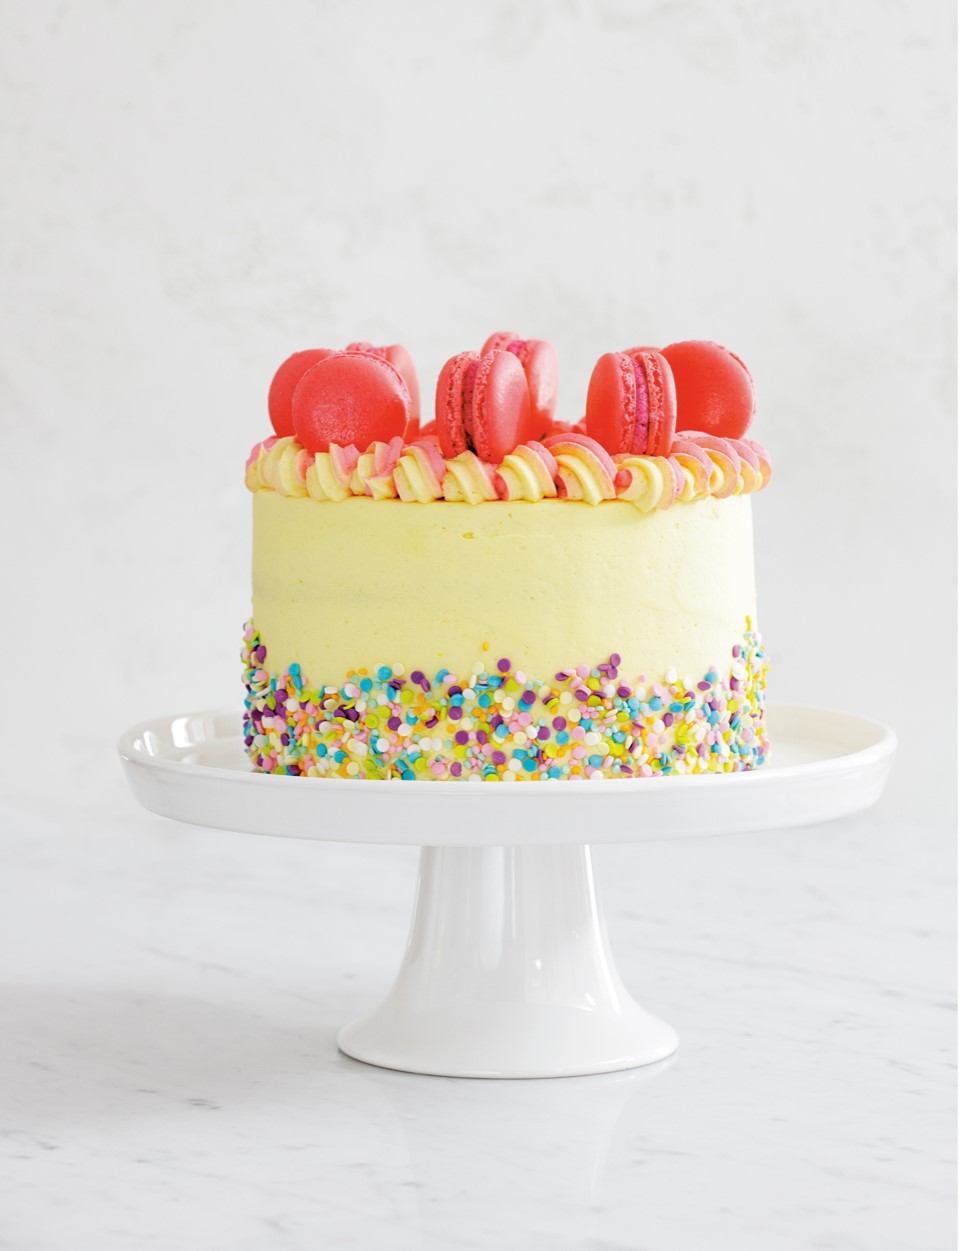
Sprinkles! It’s a word that always brings a smile to people’s faces—kids and grown-ups alike—and this beautiful white cake is decorated with lots of them. A white velvet cake is a vanilla cake made with unwhipped egg whites instead of whole eggs, so the cake has a pale colour. The boiled milk frosting, also known as ermine frosting, is silky and smooth with enough structure to hold piping detail. It sets well in the fridge but melts on the tip of the tongue faster than other styles of buttercream.
MAKES: one 3-layer, 8-inch (20 cm) cake
SERVES: 12 to 16
PREPTIME: 50 minutes, plus chilling
COOK TIME: 47 minutes
INGREDIENTS:
Cake:
- 2 ²/³ cups (350 g) cake & pastry flour
- 1 ¾ cups (350 g) granulated sugar
- 1 Tbsp (9 g) baking powder
- ½ tsp baking soda
- ½ tsp fine salt
- ¾ cup (175 g) unsalted butter, at room temperature and cut into pieces
- 1 ¼ cups (310 mL) buttermilk, at room temperature, divided
- ½ cup (125 mL) vegetable oil
- 5 large egg whites, at room temperature
- 1 Tbsp (15 mL) vanilla extract
Boiled milk frosting & assembly:
- 2 cups (500 mL) 2% milk
- ²/³ cup (100 g) all-purpose flour
- 2 cups (400 g) granulated sugar
- ½ tsp fine salt
- 2 cups (450 g) unsalted butter, at just below room temperature (65°F/18°C)
- 2 tsp vanilla extract
- Food colouring gel, powder or paste Sprinkles, for décor
- Macarons (p. 390), for décor (optional)
METHOD
- Preheat the oven to 350°F (180°C). Lightly grease three 8-inch (20 cm) round cake pans. Line the bottom of each pan with parchment paper and dust the sides with flour, tapping out any excess.
- Sift the dry ingredients and work in the butter. Sift the flour, sugar, baking powder, baking soda and salt together into a large mixing bowl or into the bowl of a stand mixer fitted with the paddle attachment. Add the butter, working it in using electric beaters or the mixer on medium-low speed until no pieces of butter are visible, about 2 minutes.
- Add the liquids. Whisk ¾ cup (175 mL) buttermilk and the oil together and add to the flour, mixing on low speed until combined. Whisk the remaining
- ½ cup (125 mL) buttermilk with the egg whites and vanilla, add at once to the batter and mix again on low speed until combined. Increase the speed to medium-high and beat well for about 3 minutes, until the batter is fluffy and thick. Divide the batter evenly between the pans and spread to level them, tapping the pans to knock out any air bubbles.
Taking the extra moment to really whisk the egg whites and remaining butter milk together will make for easier and more even blending once the mixture is added to the batter.
- Bake the cakes for about 40 minutes, until a tester inserted in the centre of a cake comes out clean. Cool the cakes in their pans on a rack for about 20 minutes before turning them out onto the rack to cool completely. Chill the cakes for at least 2 hours before assembling.
- Make the frosting. Whisk the milk and flour together in a medium saucepan over medium heat until it thickens and just begins to bubble, about 4 minutes. Whisk in the sugar and salt and continue whisking over medium heat until the mixture begins to bubble again, about 3 more minutes. Pour the paste (it will look like a very pale pudding) into a dish and let cool, uncovered, until it reaches room temperature, 68°F to 70°F (20°C to 21°C).
- Mix the butter into the frosting. Check that your butter is just below room temperature (65°F/18°C). Using electric beaters or a stand mixer fitted with the paddle attachment, beat the butter at medium-high speed until fluffy. Add the cooled milk paste in three additions, mixing well after each addition. Add the vanilla. Add food colouring to your liking. You will need to use the frosting immediately.
If the frosting doesn’t appear smooth once you’ve added the butter, increase the speed to high and continue whipping. Often the warmth generated by the friction of the beaters warms the frosting enough to blend smoothly.
- Assemble the cake. Place one cake layer on a cake wheel or platter and top with a generous amount of frosting, spreading to level (1). Top with the second cake layer and spread with another generous amount of frosting, then top with the final cake layer (2). Spread a generous amount of frosting on the top of the cake, coaxing it to hang over the top edge. Spread more frosting to cover the sides of the cake, and use an offset spatula to smooth out the frosting, joining it to the frosting hanging over the top edge (3, 4).
The outside of the cake will brown as it bakes. If you prefer to showcase the white of the cake against the coloured frosting and sprinkles, trim away the browned outside layer. Chill the cakes for at least 2 hours first and then use a serrated knife to shave away the brown layer from the top and sides as thinly as possible. Use a coarse rasp grater to shave away the brown around the top outside edge without compromising the round shape of the cake.
- Decorate the cake. Place the sprinkles in a pie plate or shallow dish and set it on the counter where you plan to work. Holding the cake by its base (or turning the cake wheel) with one hand, press sprinkles onto the bottom third of the cake, letting any extras fall back into the pie plate. Spoon any leftover frosting into a piping bag fitted with a decorative tip and pipe décor on the top of the cake. Chill the cake for at least 2 hours, then arrange evenly spaced macarons, if using, on top of the piping.
For a rainbow twist of piping, first divide the frosting into bowls, colour each of them and spoon one colour into one side of the piping bag and the second colour into the opposite side. When you start piping, the two colours will twist together as you pipe a ring around the top edge of the cake.
- The cake will keep, with the cut portion covered, in the fridge for up to 4 days.

ANNA OLSON is a professionally trained chef and the internationally known host of Food Network Canada’s Bake with Anna Olson, as well as the Oh Yum with Anna Olson channel on YouTube. She is the author of ten bestselling and award-winning cookbooks, including Baking Day with Anna Olson and Set for the Holidays with Anna Olson. Anna also has her own bakeware line, Anna Olson Kitchen. She lives in Ontario, Canada, with her husband, Michael.